See on dokumendi vana versioon!
Sisujuht
How to use RaceManager
Step-by-step
About RaceManager
RaceManager (RM) is program for sports events. RaceManager is for orienteering, running, skiing, and bicycle individual events. Supports up to 9 days/races events.
RM has support for SPORTident punching system and Tak-Soft AVS system, but with open TCP/IP connection it’s possible to integrate also other timing equipment.
Program has internal SQL-92 base database engine – no needs for extra databases. You don’t need event to install anything – just copy files from one computer to another and run program.
All reports and results are ready for publishing to webpage (html files). It’s possible to use own templates with style files.
For communication with external program (SI-Readout, timing software, online publishing and speaker programs) program using TCP/IP connections (you need license for activating TCP/IP server connection).
For each event program creates own folder – all files are in one place.
INSTALLATION
Download program and run installer. Follow instruction and install program into your computer.
After installation, copy license file (rm.lic) into RaceManager program folder.
How to use (basics)
Preparation
1) Open program and choose folder for event files (C:\events\myEvent).

2) Enter number of races or days event have.
3) Setup program (from Menu:: Setup → Program Setup)

Set timing resolution (1-1/10sec; 1- 2/100 sec; 0- 1sec) for start-, finish- and split times.
· Enter default values for vacant, start groups and start interval
· If SPORTident punching system will be used then
· Check Course – if program will do course checking
· No Finish punch - if finish time is taken be other timing system (like light beam, button etc)
· Start punch - if start time is taken by SPORTident start station
· Penalty seconds for courses where penalty is allowed (marked routes, children courses)
· Position length – position length in split time table.
· Ranking Class List – file where ranking classes are defined
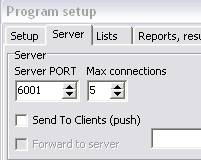
· Change server connection port, by default 6001.
· Max connection – how many TCP clients are allowed to connect with service?
· Send To clients – sends results back to listening clients.
· Lists – edit list of clubs and countries.
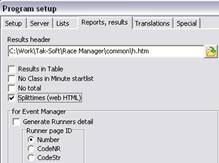
· Results header – Choose template file for reports. Sample report is in Common folder (h.html)
· Web results- settings for web results
· Results in Table – if results are in table, if not checked then results are texts and formatted with spaces.
· Translations – Translate strings for results
4) Enter event information (Menu:: Setup→Event)

· Enter event name, location, dates
· Enter also information for each race (Date, start time (local time), maximum time, race name and race main course master/organizer)
· Shortname – class name is mandatory
· Name – Class description
· Optional fields: Sex, Ranking class, age (From Year; To Year), start fees etc
· For each class enter information about race(s) – Start time (local time, 16:00:00)
5) Enter courses
· Import courses from OCAD8(text) or OCAD9 (xml) course export files.
· Add start number and additional info (length to start etc)
· Open course – no course checking
· Marked - marked course for children (penalty time is used instead disqualification)
· Name – Course name
· C.NR – Course number; 1xxx – first day and course sequence number (xxx).
· Assign course to classes
From local menu Tools choose Assign classes.

· Select course and add classes by double clicking on course row.
Enter participants
· From Menu :: Secretariat-Competitors


· Add participants manually (CTRL+A will add new record)
· ChipNr – e-chip number (sportident card number)
· Hire – person hires chip
· Group – group number for drawing
· Result level – ranking for sub categories.
· Days – select days/races when person starts.
· On fields with underline title text you may search from local runner’s database.
· Add vacancies from local menu: Tools-Add vacant
· For giving rental SI-cards for runner choose from menu: Tools-Assign chips and select text file with chip numbers.
· To view runners results select runner and press CTRL+R
6) Drawing and startlists
· Plan start times: Secretariat – Start times – Planning

· Planeeri stardiajad
· Change start order by dragging classes
· Draw Start list (Menu :: Secretary- Start times – Draw start list
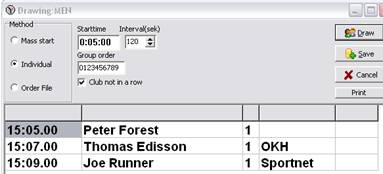
· Select classes
· Check and modify drawing rules (start time, interval, starting group order)
· Press button “Draw”
· Check result and confirm
· Save start times
· Assign numbers to runners
Event you don’t use number bibs you had to assign numbers to runners!
If necessary edit numbers file
· Assign numbers to runners. Select first number for class.

· Start list printout (Menu:: Secretariat - Start list)
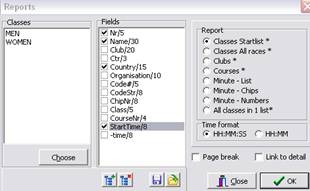
· Choose classes
· Select fields
· To change field description make double click on field and change text and field length
· Choose report:
· Classes Start list
· Classes All Days – for multiday events
· Club – Start list by clubs
· Courses – Start list by courses
· Minute list – Minute list for starters
· Minute chpis – Minute list with only chip numbers
· Minute numbers – Minute list with only bibnumbers
· All classes in 1 list
· Time format : HH:MM:SS / HH:MM
· Page break – page break between classes.
During Event
· Start Server:
Start Server service (mark “Server” checkbox on Server sub form)

Server service is available only for licensed version.
If client (example SI-Readout) is connected, then client name is shown in right panel.
· Entering results manually. Choose from menu: Results → Enter Results (F5)

· Enter (bib)number
· Select tab (start, finish, status, penalty or points) and enter new value.
Local Time – to entering time in local time (eg 16:00:00 instead event time 02:00:00, if event start time was 14:00:00)
· Printing preliminary results
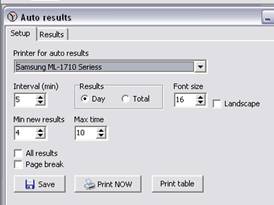
· Program automatically will print preliminary results to defined printer
· Interval in minutes when program calculates results
· Select how many new results are available and/or how old are results in class
· All results – printing all classes
· Page Break - each class on separate paper.
· Results are current race (day) or total sum of races
· On results tab is list of classes with statistical information: How many runners in class, how many are printed and what places are clear.
Results
· Choose classes
· Select fields
· Select result type
· Results by class/course
· Split times
· Races / Day’s total
· HTML for webage with menu
Optional settings:
· First – print out only first X results
· Printout for prizegiving
· All results – print also results with NA status
· Only with selected result level
Reading SPORTident cards

For reading SI-cards, please start program SIREadout.exe. You may use SIReadout in same computer where RaceManager is or over local network. You may use many readout computers.
- Enter RM Server IP address and port (default port is 6001). Test connection between server and SIReadout pressing Test connection button. If Si-Readout is same computer, use local IP address 127.0.0.1
- Select SI station serial port and speed (if SI master station using 38400 baudrate – select “BSM7 38400”).
- Select printer and layout driver. SI-Readout is design for thermal POS printers – these are fast and easy to use.
- If you like to print out speed, select min/km or km/h
- To start readout press Start button
 Menu:Reprint – printing last results again.
Menu:Backup – reading results from backup (SSD) file. SI-readout saves all read data to local folder as backup. If no network, then additionally writes to _nonet.ssd file. Before reading from backup file – please make copy from file.
statuses in program:
Statuses:
OK – Correct result (0)
Result without status (1)
OOB – out of bounds (2)
DNF – did not finish (3)
MP – missing point (4)
OT – over time (5)
DQ – disqualified (6)
DBS – did not start (7)
NC – not checked (8)
NA – Not available (9)
Controls and splittimes:
0- NA – control not checked
1- OK – Correct control
2- Man – (Manually) – punch made on map
3- MP – (missing point) missing control
4- NC – (not in course) extra control, not on his/her course
Short keys
F2 – Program setup
F3 – Event setup
F4 – Runners database
CTRL+A – Add new record
INS – Add new record
CTRL+R – Show runner’s results
CTRL+E – Change runner result
CTRL+A – Add manually splittime
CTRL+S – Shows runners results
CTRL+P – Printing runner’s results
CTRL+E – Change runner result
F5 – change runner time or status manually
SQL scripts
All SQL scripts are in program COMMON folder:
ChangeClassStartTime.sql – Changing start time for all runners in defined class. NB! Times are in ms (1/100sec)
CheckDoubleChipNr.sql - Checks double SI-Cards
CheckDoubleName.sql – Checks double entries
CheckDoubleNr.sql – Checks double numbers
ClearAllResults.sql – Deletes all results !
CourseInfo.sql – Course info
CourseStats.sql – Course statistics
DeleteALLEntries!.sql – Deletes all runners from database.
FillVacantChipNRwithNA.sql – paneb kõikkidele reservidele kiibi numbriks NA.
RunnerStats.sql – Runners statistics.
ShowRentalChips.sql – List of rental chips.
WhoInForest.sql – List of runners who are not finished yet.
how to use sql editor
SQL syntax
RaceManager have internal SQL-92 database and supports following commands:

 Add this page to your book
  Remove this page from your book
  Manage book (
 Help
Help 